


Didn’t Find what you were looking for?
Speak With One Of Our Product Experts
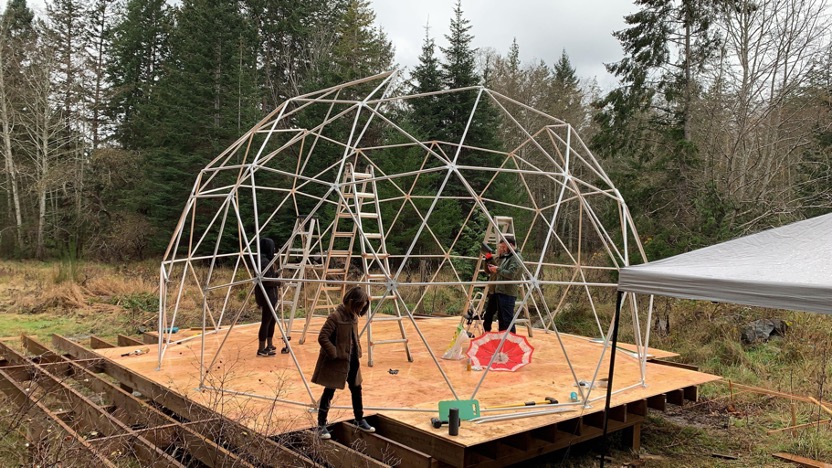
The video below shows the assembly of a 20 ft dome tent. Check out of YouTube channel for more installation videos. A detailed assembly manual is also available after purchase.
It is important to choose a site that has a level, strong, and stable foundation. Fully assembled, the dome will weigh >800 lbs. You should also consider the weight of any furniture you plan to put inside the dome as well as the people who will use the dome. A wooden deck or concrete pad (patio) are both excellent options for your dome.
Construction of your dome foundation (deck or concrete pad) must be done by a professional builder and follow all local building codes / standards. Consult with your builder about the best choice of foundation for your property and site conditions.
You can use the dimensions on the dome product page as a guide on how to size your foundation, however, we strongly recommend you build a foundation that is larger than the dome.
How you assemble the dome will affect its final dimensions; it is likely that the final dimensions of your fully assembled dome will vary slightly from the dimensions in the drawings on the product page.
If your foundation is built to fit the dimensions shown on the product page with no buffer, your dome may not fit due to small variations created by your assembly and site conditions.
Yes! If you plan to place your dome on a concrete pad, make sure the pad is reinforced with steel mesh. Your builder will be able to advise about the appropriate pad thickness given the dome’s weight and your intended application.
To prevent water from running into your dome, we recommend constructing a reinforced concrete curb (also known as a plinth) around the base of your dome. The curb should be 6” - 8” tall and will form a threshold around the whole base of your dome. If you do not include a curb, water that follows off of the sides of the dome may flow back into your dome. The steps below are a basic guide for how to construct a curb, however, you should work with your builder to construct a curb that meets your site conditions.
1. When the dome arrives, construct the base layer and first layer of your dome as well as the door frame.
2. Mark your dome’s base footprint on the pad.
3. Deconstruct the dome and door frame.
4. Around the base you marked previously, pour a flat-topped curb that is wide enough for your base plates/door frame to sit on top of (at least 6”) and approximately 6” - 8” tall. Ensure the curb is reinforced with vertical rebar at appropriate intervals (rebar can be inserted into the pad by cutting a hole with a hammer drill then sealing with epoxy).
5. Once the curb is constructed, reassemble your dome with the base plates sitting on top of the curb.
6. Once you have finished assembly, secure your dome to the curb using expansion screws or another method recommended by your builder. An example of how your dome base plates will sit on top of the curb is below.
The curb should fully enclose your dome and will help prevent water coming in underneath the dome.
Yes! If you plan to place your dome on a wooden deck make sure the deck is sitting on a solid foundation. A common approach is to pour concrete sleepers into the ground, then structural posts to the top of the sleepers. Your builder will be able to advise about the right number of posts and their spacing to create a solid foundation.
We recommend constructing a deck solely for your dome and constructing an overly large deck that will also be used for tables, chairs, or other outdoor furniture.
We recommend the following steps to create a wooden deck suitable for your dome, note that the exact design and specification should be determined by your builder depending on your site conditions and local building codes / standards.
1. Place support posts on a solid surface (e.g., concrete sleepers) and fix them in place.
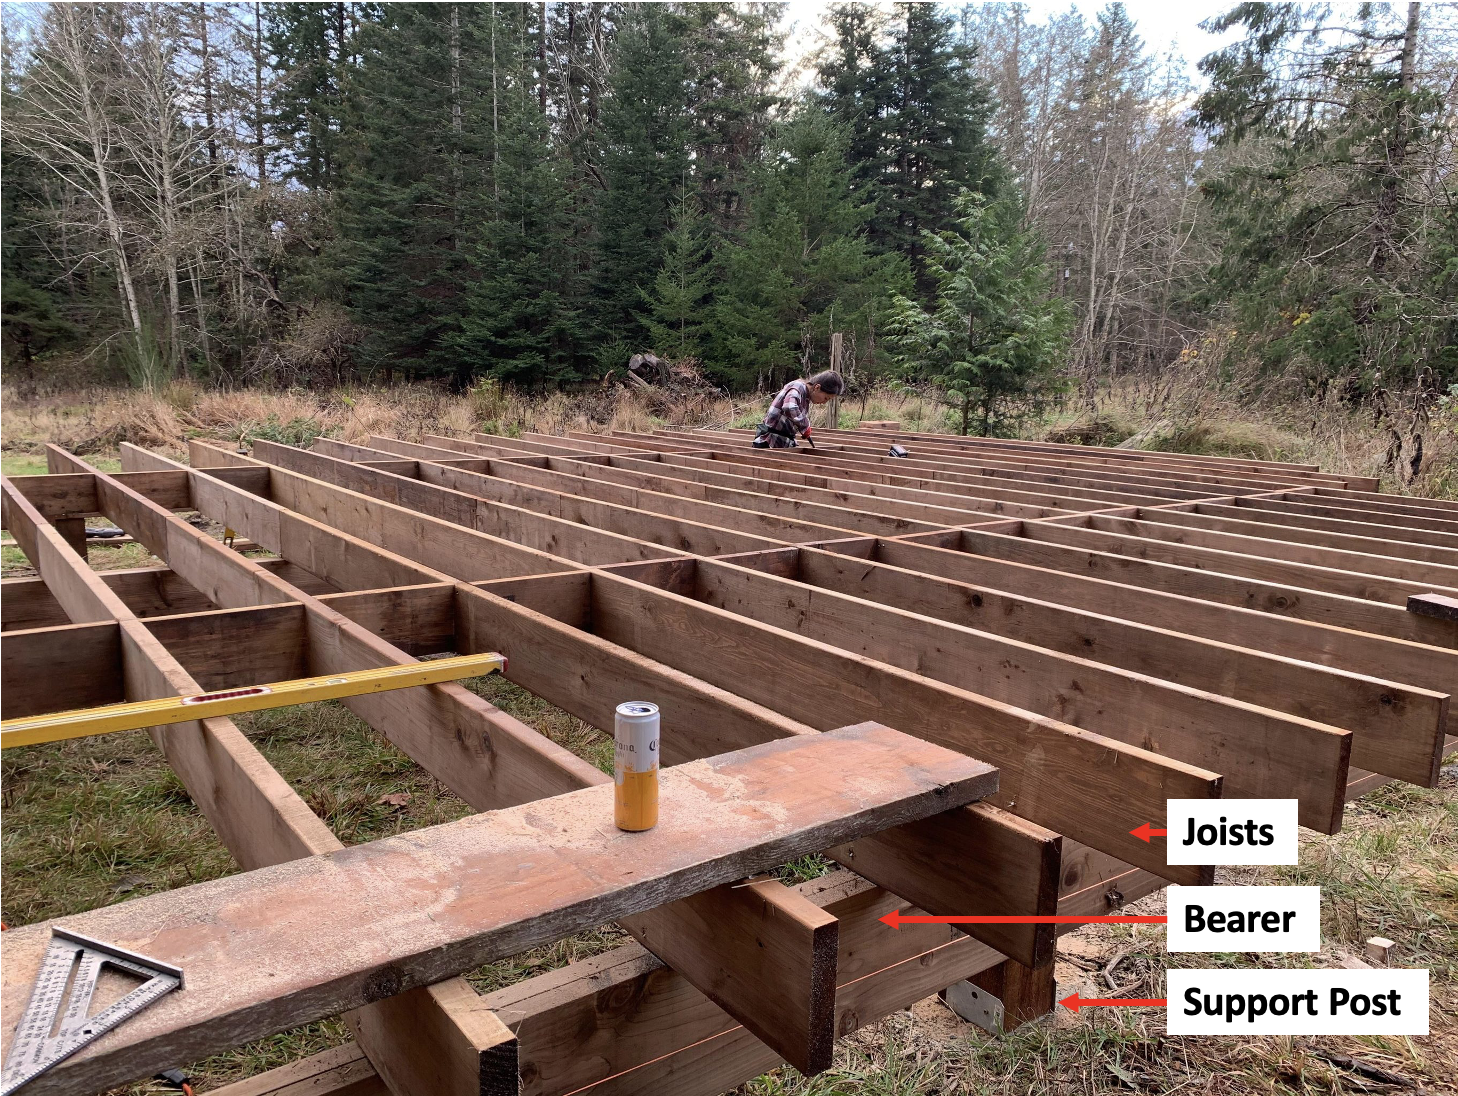
2. Fix the create a “bearer” structure on top of the posts (the bearers distribute the weight of your dome across the support posts). Bearer structures can be designed simply as a series of straight beams or as hexagon / diamond structures. The dimensions and design of your bearer structure must be determined by your builder based on your site conditions.
3. Lay joists across the bearer structure. The joists will act as your dome’s “subfloor”.
4. Lay plywood sheets across the joists. The plywood sheets will act as your dome’s floor.
5. Assembly your dome on top of the deck.
6. Secure the base plates to the deck using screws. If your base plate is not over a joist, you should place blocking underneath the plywood and ensure your screws are inserted into the blocking. If the screws are attached to the plywood alone, your dome will not be sufficiently secured to the ground. An example diagram of how blocking should be used is below.
7. Once your dome is assembled and secured to the deck, you can cut back the excess plywood and joists from around your dome’s outline so that your deck appears fitted to the size of the dome.
If following the directions above, the final layering of your deck will be (1) post, (2) bearer, (3) joists, and (4) plywood. An example of the deck layers is above.
To prevent water from running into your dome, we recommend installing wooden barriers around the base of the dome. These barriers can be fastened to the plywood floor with screws. Be sure to cut the barriers so that they also cover the dome base plates. You can add metal flashing to the surface of the barriers to increase their lifespan. An example of the wooden barriers and flashing is below. If you do not include wooden barriers, water that follows off of the sides of your dome may flow back into your dome. The wooden barriers should fully enclose your dome and will help prevent water from coming in underneath the dome.
Note that if part of your joist / plywood floor is wet while the other parts are dry, the water can “wick” through the wood and in some cases create dampness inside the dome. To avoid this you can cut your deck back so that the joists / plywood do not extend beyond the sides of the dome or purchase moisture-resistant flooring. Consult with your builder about the most effective way to prevent water wicking based on your site conditions.
Didn’t Find what you were looking for?
Speak With One Of Our Product Experts