


FAQs | Sauna | Care & Maintenance
Cold Plunge Tubs & Chillers
Payment
Sauna
Shipping
Should I treat the exterior of the sauna?
Treating the exterior of your sauna is optional, but it can help preserve the wood’s natural color and add extra protection against the elements. Sauna wood is naturally resistant to weather, so even if left untreated, it will remain durable. However, UV exposure will gradually turn the wood a silver-gray color over time.
To maintain the original look and extend the life of the wood, you can apply a water-based stain and seal to the exterior only. This type of treatment protects against moisture and sun damage while allowing the wood to breathe.
Important: Do not use stain, sealant, or other standard wood treatments on the interior of your sauna. The high heat and humidity can cause these products to off-gas, creating potentially harmful fumes. If you’d like to treat the interior, only use products that are specifically formulated for use inside saunas—these are designed to be safe under high temperatures and won’t interfere with your sauna experience.
How do I clean my sauna?
Interior Cleaning:
To keep your sauna clean, wash the interior every 3–4 months using Harvia Sauna Cleanser or another wood-safe product. Avoid harsh chemicals or ammonia-based cleaners, as they can damage or discolor the wood. Use a sponge or soft-bristle brush to gently scrub with the grain, then rinse thoroughly. After cleaning, run the heater for 1–2 hours to fully dry the interior.
After each sauna session, run the heater for an additional 60 minutes with the door closed to help dry out the space and prevent mold. If the sauna is not used regularly, place desiccants (like Damp-Rid or charcoal in dishes) inside and consider using a fan or dehumidifier to reduce moisture buildup.
To care for your heater, clean stainless steel surfaces with Harvia Sauna Heater Cleanser to remove limescale. Re-stack sauna stones every 6 months and replace them every 12–18 months, as they naturally degrade from heat exposure.
Exterior Cleaning:
For outdoor saunas, clean the exterior as needed to maintain appearance and longevity. Use a soft brush or cloth with mild soap and water to remove dirt, pollen, or mildew. For more stubborn grime, a low-pressure washer or gentle hose rinse can be used safely. Avoid high-pressure washers as they can damage the wood.
Should I treat the interior of my sauna?
Yes, treating the interior wood helps protect it from moisture, sweat, and dirt, extending its life and keeping it looking fresh.
We recommend Supi Sauna Wax as a versatile and effective option. This water-based wax contains natural ingredients that form a breathable barrier against dirt and moisture while preserving the wood's natural appearance. Supi Sauna Wax is available in clear and tinted finishes and is suitable for use on the entire interior, including walls, ceiling, benches, and floorboards. Reapply every 2–3 years to maintain protection.
Alternatively, for targeted treatment of benches and floors, paraffin oil is another great choice. It’s colorless and odorless, providing deep protection against sweat and dirt. We recommend using Harvia Paraffin Oil, but any brand is acceptable as long as it’s specifically formulated for sauna wood. Avoid general-purpose or lamp oils, as they may release harmful fumes when heated.
Apply the oil to clean, completely dry wood before first use, and reapply once or twice a year. Note that paraffin oil will give the wood a slightly darker, “wet” appearance after application.
Important: Do not use Supi Sauna Wax and paraffin oil on the same surfaces. Choose one product per area to ensure proper absorption and performance.
Should I install shingles or a roof on my sauna?
Without a roof installed, it is normal to experience water leaking through the roof boards. The interlocking staves do not form a watertight seal. We recommend installing our asphalt roof shingles which come included with each sauna kit, or purchasing one of our metal or beveled roof upgrade kits (only available for a select line of saunas).
It's normal for some water to seep into your sauna on a rainy day, especially on days when wind is blowing rain onto the side walls of your sauna. This will not harm your sauna or diminish its lifespan. After a heavy rainfall, we recommend you turn the heater on for a 1-hour cycle to dry out the room. Running the heater a couple of times a week during the wetter months will help prevent mold or mildew from developing.
How often should I adjust or replace my sauna rocks?
When you use your sauna, the rocks in the sauna heater will be heated to very high temperatures and then cool back down. Over time, this heating and cooling cycle creates cracks in the rocks that will grow. Eventually, your rocks will break into smaller pieces and you may even see pieces of rock or dust come out of the bottom of your heater.
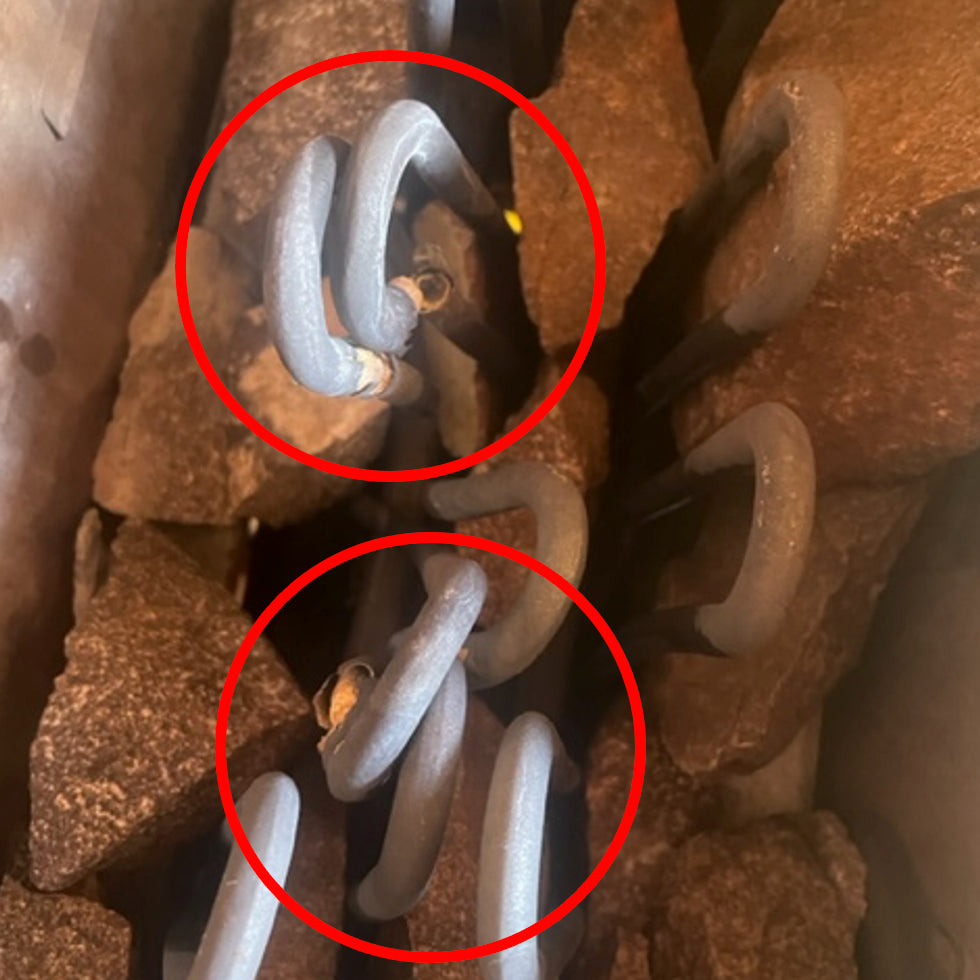
As the rocks shrink they will settle inside the heater. You may notice it looks your rocks are gradually 'sinking'. This process can push the coils out of position and into contact with one another. (See photo below)
This is an issue because if your coils come into contact with each other they will quickly burn out and need to be replaced.
We recommend that every 6 months you turn off your sauna heater at the breaker and remove all the rocks, then re-stack them so the coils are in the correct position (vertical and not touching).
Harvia also recommends that you replace out your rocks every 12 to 18 months.
How often should I re-stain the sauna?
Stain-and-seal products usually last about 5-7 years after which time you would have to reapply a new coat. If you’re unsure how often to reapply, talk to someone at your local building store who can give you region-specific recommendations.
What should I do if water leaks into the sauna?
A small amount of water seeping into the sauna isn’t going to hurt it and is likely due to condensation. If you notice a substantial amount of seepage, this may mean that your bands have loosened, and water is getting in around the staves.
The wood will naturally shrink during warm dry weather so cracks can appear after extended periods of warm weather. The wood will also naturally shrink with age so cracks can appear after a few years of use. Check the tension of the bands every few months so you catch problems before they start. If you notice the bands are loose, retighten them following the same process as when first installing.
If you are unable to close cracks by tightening the bands, it means you need to add more staves under the bands. When the inside and outside of the sauna are dry, take apart the top portion of it and rebuild it with additional staves.
We recommend adding shingles to the roof of your sauna as they will significantly increase your sauna's longevity and water resistance.
How do I prevent and treat mold in the sauna?
After you have finished each sauna session, we recommend running the heater for an additional 60 minute cycle with the door closed. This will dehumidify the room and dry out the wood. If you are using your sauna regularly (i.e., multiple times a week) and drying out the room after each session, this should largely prevent mold formation.
If you are not using your sauna regularly, run a dehumidifier and/or fan inside the sauna to keep air circulating (and empty the dehumidifier water tank regularly). Also place desiccants (e.g., a commercial desiccant such as Damp-Rid or non-commercial desiccant such as charcoal briquettes/kitty litter) on dishes and place them around the inside of the sauna.
Like any outdoor structure, mold can develop as a result of moisture getting trapped inside the sauna. This is especially true for saunas as the bathers will sweat, releasing additional moisture into the air which can be absorbed into the wood. The key to preventing mold from forming is to ensure the inside of the sauna is frequently dried out. Apart from plain water, never eat or drink anything inside your sauna.
If you see mold on the inside or outside of your sauna, this should be treated early before it has time to grow and take hold. Clean the affected area to remove the mold. The wood can be cleaned by spraying down the area with white vinegar and then scrubbing the area with a scrub brush and soapy water. If you are unable to remove the mold with vinegar and soap, try stronger cleaning agents such as 30 Seconds Outdoor Cleaner or Behr All-in-One Wood Cleaner. Rinse the sauna thoroughly with water to remove the cleaning solution. Run the heater for 1 to 2 hours to dry the room. Any rags or scrub brushes that come into contact with the mold must be disposed of. Proper protective equipment (goggles, mask, etc.) must be worn when removing mold.
Didn’t find what you were looking for?
Speak with one of our product experts